Needed to reshape the grips. Plowshare was a bit big even though a colt plowshare and closer to the trigger than the ruger plowshare grip.
About 90% shaped. Good enough now for a checkout at the range. If all is well, it'll be time to start finalizing this one and getting it ready for bluing.
A little bit more work along the transition line to soften the grip and get it flowing smoothly top to bottom and front to backstrap.
A break between hunting trips and its time to get this Gentleman's Workhorse set up with functional ejection and a way to dismount the cylinder without having to remove the entire ejector rod assembly each time. Ala the Blackhawk Lightning....a slightly modified Cimmaron Thunderer Cammed Ejector Rod Housing and a bit of fitting and one last hole to drill and tap in the barrel and its on there and functioning properly.
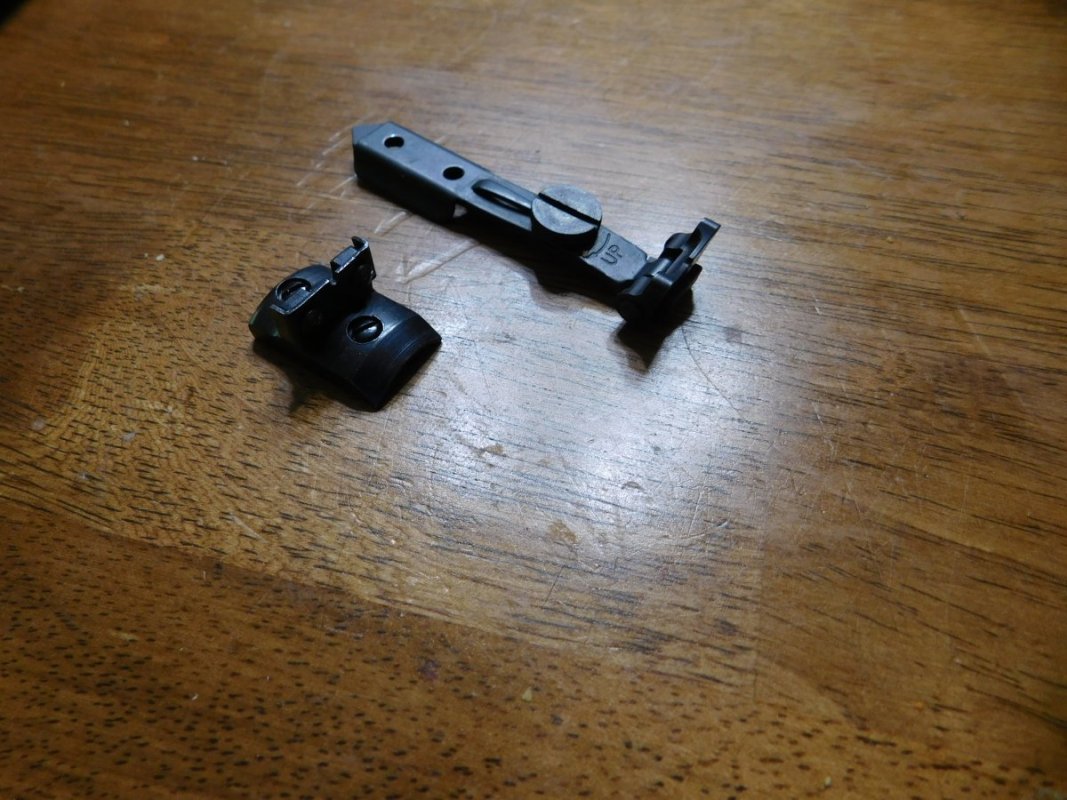
A quick look at the parts....Cimarron cammed ejector rod housing with the frame end slightly tweaked so the housing lays flat on the slightly tapered Ruger barrel. Sand it in with the barrel as the jig. The ejector rod, shortened, spring way extended forward, ruger button head converted with a small under cut to clearance the cylinder pin. Return spring shortened and lightly crimped on the cut end which goes toward the button head. Finally, the Ruger screw, its threads removed, drilled and tapped 6x48 to go over the similar sized stud I like to put in the barrel to save wear and tear on the barrel threads over the long haul.
Function check....with some smoothing of the button head where it rides in the ejector rod housing, a bit of shortening and I have just over 2/10" lift. Enough to eject most cases with the muzzle up and allow plucking out those that don't fall. I've found muzzle up with smart push on the rod will dump most of them most of the time....no plucking.
Here the cylinder pin still in place but as you can see, with caming the button and an undercut of the factory button, the rod and button clear each other well for disassembly. The cylinder pin can be fully withdrawn for cleaning with out repeated dismounting of the ejector assemblage.
A view of the assembly head on. Looking like a good factory job, but I don't think Ruger ever made one with a true 3.5" barrel and fully functional ejection system.
And two views of the nearly completed package. Final shaping, polish and blue to do! Prolly oughta shoot it after a good cleaning. Bisley trigger too, maybe soon.
Sharps, that bloodwood really looks great on the birds head type grip shape. I think you did good , of course it is looking like anything you do is excellent. That sight would look good with a little engraving work to bring out the details of the buffaler , but looks fine as is too!
Thanks. Still playin with the wood. Might need it a bit thinner but just a lick of urethane for now....will sand and seal after the test fire if its the right size.
Went with the heavily worn out buffler nickles for this run. If they hold and I do some more I'll plan on using some with better definition. But yer right, I was thinking I'd go back with a gravers point and perhaps sharpen up some of the shoulder lines a bit before the final install.
When yer doin all the work yourself, the major cost is mistakes. The major reward is a job done well on the features ya want but might not afford from one of the big smiths. Its so important to learn to do good handwork. Then you don't have to deny yerself many of the neato guido features on the custom safe queens that only get arm chair raced and never shot.
So....scalloped off side recoil shield. 45 minutes start to finish. Tools: Rat tail file, C-Clamp (to hold the frame down/still), half round file, drill press with a 1" sanding drum loaded with a drum of 80g and a drum of 120g.
I like it. Nice place to rest the offside thumb....over the shooting thumb and against the scallop for a grip swallowing/well controlling grip.
Could go deeper and further forward for a bigger scallop like some I've seen but this leaves a nice band of metal on the recoil shield that retains that Ruger beefy strong appearance too. I've seen some with a knife edge recoil shield and I don't like it.
The colt design is a left handed gun....Sam was a Southpaw....that's why the loading gate is on the right so you don't have to let go of the grip to open the gate and punch out the empties! The entire gun was designed to be loaded/unloaded with the left hand on the grip using the left thumb on the gate and cylinder and the right hand to punch out shells/drop new ones in!