• ODT Gun Show & Swap Meet - May 4, 2024! - Click here for info

The Arthritis Project

Parts arrived. The open back Hogue grip is nice. Not too fat and tackey enough to feel secure with even a light grip. They fit pretty well too....not the easiest to install though. Still a long reach to that high Ruger hammer but its very easy to thumb it back and even easier to let go of the trigger and palm the hammer back with the off hand. I believe these will do fine and no choking down on a smaller slicker grip, should be about right for controllability with some arthritis in the hands and fingers. GoodWife even says she likes the grips...then snugged in the gun close to the right side for retention and palmed the hammer back with ease for the short shot.....incidently, we dry fired it about another 50 times and the refitted and staked recoil shield is holding in place just fine. But, a new recoil shield arrived and we'll see if we can straighten out the crosspin hole and get the new one properly retained for the long haul.

i.imgur.com_saWd5yj.jpg


i.imgur.com_685szUz.jpg


i.imgur.com_2mG0AQ0.jpg


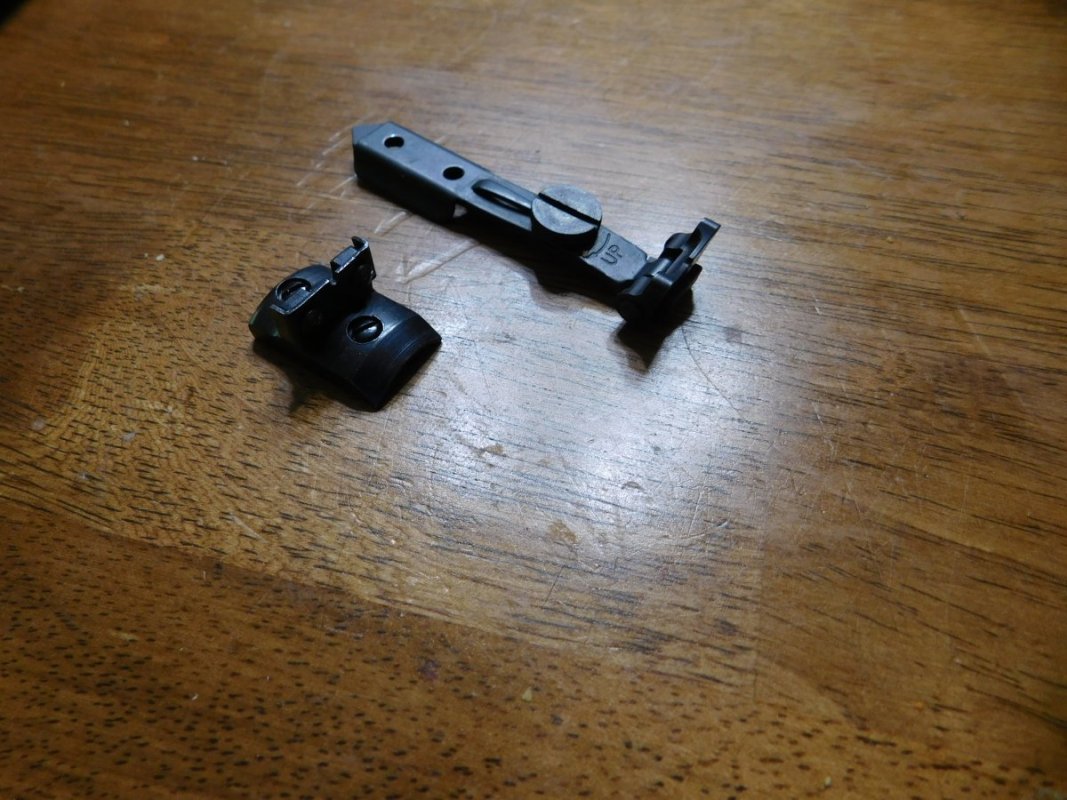
As for the new rear sight. I like it a lot. Very nice and a complete package for $15. The sight, blade (I need to add the white for the outline in the groove), screw, springs and cross pin. Best thing about it,.....it ain't broke and it ain't got all the color wore off of it.

i.imgur.com_ORotdVV.jpg


i.imgur.com_JlPmnpW.jpg


i.imgur.com_lB0JMlD.jpg
 
Some folks don't like fire sights. I love em. Only ever broke one. ... I reinforce them at final assembly with a drop of clear super glue along the bottom. Even if a light pipe breaks, most of it stays in and yer still hunting. To remove, just warm it up and put in a new one. All in all, plenty rugged and great for older eyes. Most of my rifles are scoped now but everything that has backups or simple irons usually has a lite pipe site for best work.

A bit square but sturdy. I mount them backwards....angled side toward the shooter. Makes a slightly larger dot and I think it glows better. Looks fine on there. About 10 minutes work with a safe sided file to under cut the angles of the dovetail that last little bit and it was thumb push for 1/3 and light taps with a brass rod to drive it home. At final assembly, I'll sometimes put on a drop of black max to keep it from moving later but mostly, friction is all that's needed to keep the sight in the dovetail till ya tap it out.

i.imgur.com_uMKi2dD.jpg


i.imgur.com_bLC1JdV.jpg


i.imgur.com_LS1lf9a.jpg


i.imgur.com_1exEG1d.jpg


The whole view....

i.imgur.com_t6I0Vwe.jpg


Updated operational view....looking over and thru both new sights.

i.imgur.com_a4vtFtP.jpg


i.imgur.com_zMmyw5N.jpg
 
Fitting a Bisley hammer to a Ruger is another one of those simple jobs that can be done in a couple hours with some simple power tools and stones.

Differences in the Bisley hammer are: The big lower loop that needs contoured to match the old hammer. The nose will need stoning to ensure proper firing pin protrusion when installed. I have never needed to stone the sear notch. The wider and lower spur up top is great for ease of access and gives great purchase for thumbs or heal of the off hand when drawing the hammer back. This one is stainless steel, so once polished and jeweled, its fire and forget. Sometimes the nose of the hammer needs tapered so it doesn't hit the edges of the frame.

I start by marking off the metal to be removed using the hammer pin and old hammer as a guide.

The green area is for removal.

i.imgur.com_TJFWZr5.jpg


Initial and very rough grinding is done on an 80 grit sanding wheel. I dip in water but never fear, ya just can't hold on to it long enough to reach tempering heat. I dip enough the steel doesn't even turn straw colored at the edges.

i.imgur.com_VrTmK4q.jpg


Stoning with a medium oil stone brings the shape and finish up to about 90%. I like a touch of convex curve on the back of the hammer....it makes a nice curved line under the hammer spur.

i.imgur.com_k0xRcna.jpg


There is plenty of room in the guard slot, so I left the lower curve of the Bisley hammer a bit larger than the factory hammer. Here you can see how much lower the Bisley spur is compared to the original hammer. Better for small hands or perhaps weak thumbs.

i.imgur.com_c3IFzIz.jpg


Shooters eye view of the two hammers side by side.

i.imgur.com_53LsABg.jpg


Installed in the frame and function checked. Fingers are tiered so I won't cut the hammer nose back tonight. I have a touch of arthritis too and it can make long sessions and fine work difficult to do except in small batches. But, this weekend I'll get the nose pared back so that the firing pin can reach out and smush primers with the new and more functional hammer.

i.imgur.com_gqpnCWA.jpg
 
Wish I could find a bisley trigger for this one....moves the trigger rather further back in the trigger guard....makes for much shorter reach.
 
With the cylinder installed, there is .063" clearance between the rear of the cylinder and the face of the recoil shield.

With the original hammer installed and pressing forward on the transfer bar/firing pin assembly (no transfer bar pinch) the firing pin protrusion into the area occupied by a primed case is .025".

The nose of the new Bisley hammers must be fitted as they are usually left long for this purpose and due to changes in transfer bar thickness over the years.

Carefully stoning the nose of the hammer, spotting it in against the frame with Prussian blue I pared the nose back to where the firing pin protrudes into the space occupied by a primed case .030" when the hammer is compressing the transfer bar/firing pin assembly (and without creating transfer bar pinch). I have found a range of .030" to .035" protrusion thru contact with the transfer bar provides very reliable ignition with all primers I've tried (American makes and Fiocchi....never tried Wolf or other cheepies). It has been my experience that under .025" protrusion with transfer bar contact leads to occasional to regular failures to fire. Naturally, the firing pin is a free running fit and spring loaded so it can fly further under inertia and eventually onto its stop thereby protruding further than the transfer bar can move it.

Test it your self. If a new Bisley replacement hammer is giving light strikes, a layer or two of electrical tap on the second step will likely result in perfect ignition (by adding the shim you effectively created a shorter hammer nose/shallower second step and consequent better contact between hammer step and transfer bar). If the tape trick works you know for sure the nose of the new hammer is too long and the firing pin protrusion is likely less with the new hammer than it was with the original and fitted hammer. Or you can just measure the pin protrusion with the old fitted hammer and set the new hammer up to provide the same or a scooch better.

Here it is. Nose stoned flat, shorter and in full contact with the frame. No transfer bar pinch. Good firing pin protrusion off the transfer bar and the edges of the hammer nose back beveled slightly so there is no hammer contact with the frame edges. 30 minutes or less. Easily done.

i.imgur.com_eNcZ3On.jpg


i.imgur.com_STJouGF.jpg


i.imgur.com_TFz86Zk.jpg
 
Ready for the range. Much dry firing going on in the fitting to date and the recoil shield, knurled and staked, remains unmoved and unmoving, even without contact from the factory miss-drilled cross pin.

No more work now until its test fired on the range with at least 50 each 38 +P and full house 125g and 158g 357 Magnums.

A couple final tweaks bringing the fitting of action parts for arthritic hands up to the 90% level.

To provide greater purchase and more reliable actuation of the loading gate, I have back cut it, much like the 1860 Army Colt project. If it works better for cold stiff fingers, it stands to reason it will be a more positive functioning gate for stiff arthritic fingers.....jam in a thumb or finger and lever it out and down with ease.

i.imgur.com_GFi1XDd.jpg


Much more room to jam a finger behind the gate for quick and positive opening to load or reload.

i.imgur.com_ZnajIc1.jpg


The fitted SS Bisley hammer is placed against the buffing wheel and brought up to a mirror shine. It'll get jeweled on the sides later. But for now, the dull look is gone and so are all the fitting marks from converting it to be used on this frame.

i.imgur.com_AmcuXls.jpg


A brief review of the work done so far to help tailor this handgun for smaller, stiffer and somewhat weaker hands.....

1. Shorten the barrel to 4 5/8", square it, crown it and bevel its outside circumference to eliminate the sharp edge. Dovetail it and install a .538" high Williams Fire Sight (backwards so the orange dot looks a bit larger and brighter). The overall weight mimics the favorite DA Magnum currently in the nightstand. Balance should be about the same and the barrel is long enough to help mitigate some of the disconcerting blast that occurs when any caliber round it touched off.

i.imgur.com_DO9O1cq.jpg


2. The broken and beaten rear sight is replaced with a new factory assembly, ready for service and the rear notch is grooved so I can add the white outline before final assembly.

i.imgur.com_nFpJZ2d.jpg


3. The new, lower, wider Bisley hammer in place and passing all initial function tests. This hammer with the original trigger and slightly tweaked legs on the trigger return spring is providing a consistent 4 lbs 2 ounce trigger pull. Range testing and safety checks are pending. Cocking the wide and low hammer is much easier with thumb (s) or off hand palm than the skinny and stiff hammer of the Taurus 66.

i.imgur.com_PVgqk5Y.jpg


i.imgur.com_qUH30Uj.jpg


5. Soft and sticky Hogue open back grip doesn't increase length of pull and should allow a hand no longer able to close firmly on a small grip to retain and control the handgun.

i.imgur.com_iFO7jYz.jpg
 
50 rounds of 357 mag at 10m. No issues.

Another 100 rounds of 357 fired at steel, no issues!

The grip is wonderful for recoil control!

i.imgur.com_ApNf9ic.jpg


Time for an ejector button. We will try this one which is undercut to hook the finger into and we will try the story large bullseye. Which ever one she likes is the one we'll go with.

Remove the old ejector button, usually takes heat and some grinding or even slotting first.

Cut a new ejector shape and drill for the ejector rod.

i.imgur.com_kSBlQQ2.jpg


After soldering, filing, fitting and polishing....

i.imgur.com_gN31qRr.jpg


i.imgur.com_STHYRDs.jpg


i.imgur.com_U7kRwkA.jpg
 
Last edited:
I am 52 and have author in every major joint in my body. Left hand is worst than right and in the left it is mainly in my thumb. I am having Back surgery the 23rd of this month to fuse L5-S1. and that is all my surgeon will touch and I am only 52yrs old. Working 16 hrs a day 7 day a week caught up with me. Now all the money I had is gone. Oh well at least I am still above ground. I am going to enjoy seeing this build. Good Luck.
 
50 rounds of 357 mag at 10m. No issues.

Another 100 rounds of 357 fired at steel, no issues!

The grip is wonderful for recoil control!

i.imgur.com_ApNf9ic.jpg


Time for an ejector button. We will try this one which is undercut to hook the finger into and we will try the story large bullseye. Which ever one she likes is the one we'll go with.

Remove the old ejector button, usually takes heat and some grinding or even slotting first.

Cut a new ejector shape and drill for the ejector rod.

i.imgur.com_kSBlQQ2.jpg


After soldering, filing, fitting and polishing....

i.imgur.com_gN31qRr.jpg


i.imgur.com_STHYRDs.jpg


i.imgur.com_U7kRwkA.jpg

One of the purtyest and slickest ejector buttons I ever did see! As usual, great job brother!
 
Back
Top Bottom