• ODT Gun Show & Swap Meet - May 4, 2024! - Click here for info

Remington 513 assembled & range report.

loadnplenty

Default rank 5000+ posts Supporter
The Hen that laid the Golden Legos
197   0
Joined
Mar 18, 2011
Messages
7,513
Reaction score
1,102
Location
Walton Co.
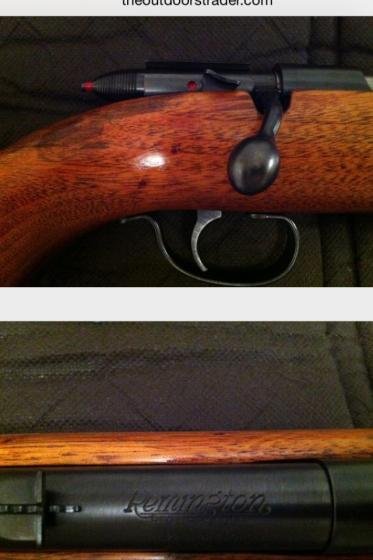
So a year or so I refinished this Remington 510 by rust bluing it and redoing the stock. The metal finish was not quite as dark as I hope for with the 400 grit sand. But I was pleased with the overall finish since when I purchased the rifle it was covered in rust and you couldn't even read the model number.The stock had some streaking in the stain so it wasn't quite perfect either but looked nice. Overall for an amateur it turned out ok.
 

Attachments

  • image.jpg
    image.jpg
    27.2 KB · Views: 44
  • image.jpg
    image.jpg
    27.4 KB · Views: 40
  • image.jpg
    image.jpg
    26.9 KB · Views: 40
Last edited:
In order for this to conversion to happen I need a few parts, the stock. I found it in a pawnshop and have $20 for it. It was complete minus the mag latch. It has several miltary markings on it along with 70 years worth of oil stains and character mark. This one piece is what got me thinking about the project. That was 3 months ago. The stock was sanded on one side when I bought it.
 

Attachments

  • image.jpg
    image.jpg
    28.4 KB · Views: 36
  • image.jpg
    image.jpg
    23.8 KB · Views: 34
  • image.jpg
    image.jpg
    50.1 KB · Views: 35
So last week I had the winning bid on EBay for a 513t rifle barrel. It was a military barrel. Honestly I think it's cool but it had nothing to do with my decision as this is the only I saw availible.
 

Attachments

  • image.jpg
    image.jpg
    10.5 KB · Views: 34
  • image.jpg
    image.jpg
    15.3 KB · Views: 33
  • image.jpg
    image.jpg
    14.1 KB · Views: 35
  • image.jpg
    image.jpg
    14.5 KB · Views: 36
Friday afternoon after I woke up USPS delivered the barrel and I mounted to the reciever and stock and test fired it without issue. My overall plan is to have the reciever drilled and tapped for scope mounts. I have no plan of putting the peep sight on the back. This rifle will in "NO WAY" be a true 513t in the purist sense. Bottom pic is what I am looking for when I am finished.
 

Attachments

  • image.jpg
    image.jpg
    56.2 KB · Views: 32
  • image.jpg
    image.jpg
    19 KB · Views: 30
Next was to order parts from Numerich that I needs to make this happen. One of my extractors was worn on the 510 so I went ahead and ordered two new ones.
 

Attachments

  • image.jpg
    image.jpg
    19.7 KB · Views: 28
As of right now the stock is sitting and drying out after being stripped with citrustrip. Then I scrubbed the hell out of with a degreasing agent. I think my finish is gonna be a straight true oil finish. 70 years of oil has it pretty dark in some areas. I looked into the whiting and other options. Gonna see just how much is left after It dries. From there I will probably use my wife's iron and a wet cloth to steam up some dents and try to extract what oil I can.
 
Here is the wood. I even found a new stamp on the wood "FJA", but it was very faint and only after removing the old varnish.

All other markings still look good. The "RRA" was worn in some spots to begin with bit is still hanging in there.
 

Attachments

  • image.jpg
    image.jpg
    33 KB · Views: 27
  • image.jpg
    image.jpg
    49.4 KB · Views: 31
  • image.jpg
    image.jpg
    64.6 KB · Views: 29
  • image.jpg
    image.jpg
    57.2 KB · Views: 27
Last edited:
Here are some overall pictures of the stock. And now off to steam some oil and dents while the wood is still a little damp.
 

Attachments

  • image.jpg
    image.jpg
    38.6 KB · Views: 30
  • image.jpg
    image.jpg
    55.2 KB · Views: 29
  • image.jpg
    image.jpg
    59.3 KB · Views: 29
  • image.jpg
    image.jpg
    46.4 KB · Views: 31
  • image.jpg
    image.jpg
    47.8 KB · Views: 31
I went to look at the stock see how it was drying and noticed a small crack has elongated since all the stripping and washing. I went ahead and applied some wood glue and clamps and gonna let it sit overnight and see how it looks when I get up in the morning. It looks as though it is trying to go all the way through the forearm.

I have never done it before but I was debating in whether to go ahead and break it off and epoxy it back in place prior to finishing. Since I have never done that before I just went with glue and clamps for now. After taking the pics I wiped off the excess glue.
 

Attachments

  • image.jpg
    image.jpg
    46.1 KB · Views: 32
  • image.jpg
    image.jpg
    38.3 KB · Views: 30
  • image.jpg
    image.jpg
    51.7 KB · Views: 30
  • image.jpg
    image.jpg
    41.4 KB · Views: 30
After a good sanding by hand with various grits I have applied the first coat of true oil rubbed in by hand. The stock itself has quite a bit of oil staining in various places. It will match well with the minor chips and dings I was unable to remove with sanding and steaming. It's 70 years old so I guess they will be referred to as character marks.
 

Attachments

  • image.jpg
    image.jpg
    60.2 KB · Views: 25
  • image.jpg
    image.jpg
    59.4 KB · Views: 25
  • image.jpg
    image.jpg
    51.1 KB · Views: 27
  • image.jpg
    image.jpg
    54.2 KB · Views: 25
  • image.jpg
    image.jpg
    42.4 KB · Views: 28
Back
Top Bottom