• ODT Gun Show & Swap Meet - May 4, 2024! - Click here for info

Blackhawk Restyle

Spent the evening final fitting the grip screw holes to frame screw holes....done. Lined up and cut a new front sight dovetail...straight up and down and perfect. Taller try sight installed for now. Love it....have a fine brass bead sight to go on there after bluing the gun, but this is good for now. Looks like I can't dally too much longer. Gotta cut curly maple or walnut for grips this weekend and see if I still got the grip makin touch.

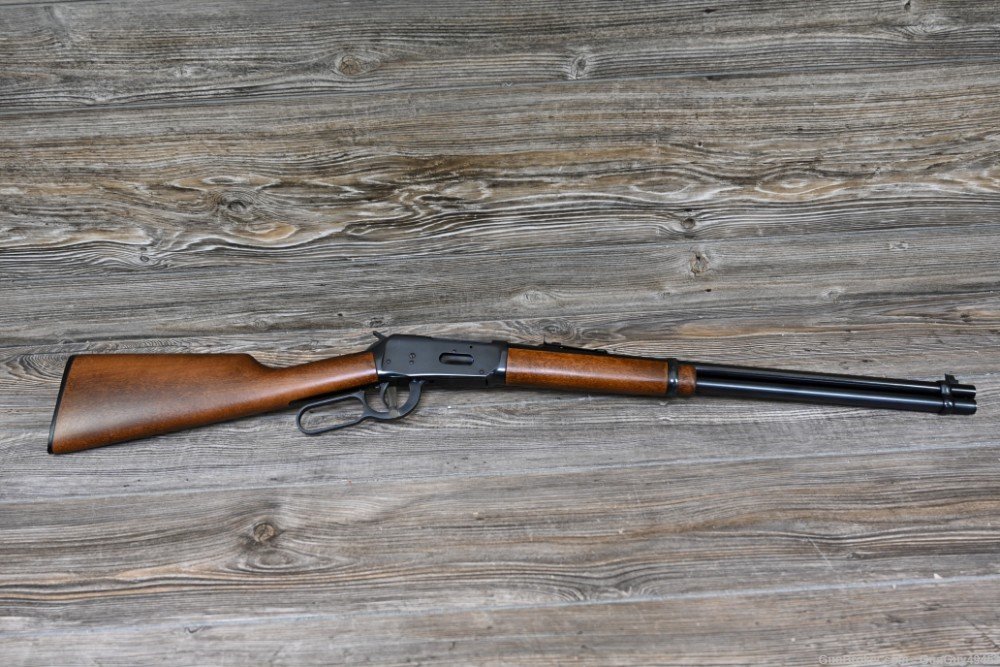
Here it is with the taller try sight. I think it looks good. I'll get better pics at the end, after its all together. Gonna make a nice gun for someone I think.

i.imgur.com_Swb0495.jpg
 
With some stiff paperboard, tablet backing, I start on the new grips by making a pattern of the Frame. Not the grip, since I don't like the shape or fit of the cast/checkered grips that come with the brass frame.

i.imgur.com_J3xYnOg.jpg


I cut it out and check the fit, retrace a new and tighter line so I can cut it out again, much smaller. I use small barbers scissors for the cutting, sharp and precise and easy to carve away 1/2 of the width of the lines I have traced.

i.imgur.com_hVFOrDK.jpg


Much better, now the cardboard template is only a whisker larger than the frame I'll mount the new wood to. I labeled the template, R is Right panel outside, L is Left panel outside....comes in handy when tracin on the wood since I might want to keep a particular spot of figure up or a flaw down.

i.imgur.com_xKi9eC5.jpg


These two spots on the maple blank appear to be flaw free.....I'll lay out the two grip panels here and we'll see what happens as the wood chips begin to fly. After trimming to thickness and cutting the blanks out, I'm thinkin much of the roughin in work will be done on the drill press with drums and the bench sander. I'll have to keep the blanks cool and I'm going to make them thicker for a bit fuller grip in the hand.

i.imgur.com_Xcb7Pdh.jpg


Hope the wood don't break!
 
Its spalted curly maple. I will likely have to vacuum finish em, or a several day soak in urethane or I'll glass bed the panels into place. Got a flaw runnin thru the left grip panel. Its tight but one or the other treatment should stabilize it spanky good. Dayum, them lil grips is a lotta work but I'm nearly 75% done. Gotta do some pics affore it gets too far along.
 
I didn't take photos as I went along cause its been a long time since I worked on grips and a long time since I used spalted curly maple....weren't sure if it wassa gonna work. So far so good.

Started out with a 7/8" thick blank and planed both sides, trimmed the ends and chopped out what I needed. Selected top and bottom sides and traced the pattern and rough cut it out. Sanded to the lines with the drum and belt sanders. Left the wood a bit thicker than the original grips so I could get a bit better hold....the checkered grips would be good for a small man or a gal, they are very slim.

Then I had to hand cut the reliefs for the fingers in the grip frame that engage the action at the back....

i.imgur.com_JfZGmR7.jpg


Test fitting to the frame showed me where to drill the holes for the alignment pins and the grip screw and eustuchens.

i.imgur.com_TnIlqhZ.jpg


Then started the shaping....the drum on the drill press let me start the angles around the curves and to releave some wood for the trigger finger and thumb. I left the wood wider at the top than the frame on purpose, such a mushroom on top positions the gun in the hand the same each time and makes for a more repeatable grip and a bit larger around for a stronger hold.

i.imgur.com_20jA8QA.jpg


Right grip is about 70% shaped. Done with the power tools on this one....cept for putting in the grip bushing. From here, this one gets hand sanded on the frame (yep, frame'll need repolished!)

i.imgur.com_rlzp37b.jpg


Grip in the foreground is the right side panel, still rough. It needs its grip bushing installed and power sanded. Then I'll finish sand it on the frame too. Its shape will be a tweek different from the right as I'm checking the feel as I go and kinda adjusting for the curve of my hand, fingers, etc. Might even put a ring finger groove in the left side grip tomorrow.....The figure and grain don't show now but a bit of work with torch or Heat activated acid stain will make it pop right out.....

i.imgur.com_KlZaqb7.jpg
 
First panel, LS is shaped and fitted....final step was to break the sharp edge of the grip all around so it blends better with the curves of the grip frame and won't chip/snag later.

So, I made traditional repairs to the main potential future flaw in this piece. It has a spalting line up from the bottom that while tight and not a crack, could become one later. It didn't open with all the abuse and heat in shaping but I figured I'd stabilize it in a traditional manner (mostly I don't wanna sacrifice my bicycle pump to make a vacuum chamber for one set of grips.)

So, for now, after all the preemptive work to keep a spalt line a simple line, a 30 minute soak in urethane to drink up as much as it'll take. The wood is light and open and this thin mix will soak in deep giving a much more durable and moisture resistant grip.

i.imgur.com_ZQ3s8NZ.jpg


Mean while, the right side grip gets a touch of bedding at the locator pin and we have a touch of a gap at the upper part of the frame.....not sure how I'll deal with it or if I will at all. This gap was also there with the original grips....its a touch smaller on the opposite side and I may just ignore it as its not noticeable for the most part.

i.imgur.com_UpJEdzd.jpg


After the soak and the wipe down the curl is very evident. The amber tone of the urethane is enough to bring it out and give the wood a lovely honey tone over all.

i.imgur.com_CaECDMK.jpg


The grip screw bushing is plugged with clay to keep it clean until I'm done. Meantime you can see under the flash that I drilled the grip front to back down near the tail. Filled it with glue and then tapped in a maple pin (toothpick)....that will strengthin that spalt line down low at the bottom of the grip.

i.imgur.com_nKa9020.jpg


From the backside, I stop drilled the spalt line at its terminus and a touch before the end and packed the holes full with glass bedding epoxy. This should prevent the spalt line from opening at the top.

i.imgur.com_ZHIgw2X.jpg


Nice color and shape and pattern. I'm thinkin the brass should have a bit of a light brown tarnish when finished. I will further seal and buff the grips but I be leavin em satiny not gloss.

i.imgur.com_EzW6cty.jpg
 
Folks keep suggestin fileing off the Ruger roll mark on the left side of the barrel.

Short response is NO.

Longer response is thats more properly a disassembly job with lathe work in order to prevent having a sloppy job, one thin side egg shaped barrel. Sloppy work and lathe work are beyond scope for this thread (good hand work being the theme) and so, NO, the roll mark stays.
 
While the second panel gets its soaking of urethane, here are both panels done, short of a bit of finish and rubbing out.

i.imgur.com_TbJuPN3.jpg


i.imgur.com_8NWXVGs.jpg
 
Color on the left panel is a bit different now because the urethane has not kicked over. It needs a touch more sanding around the grip screw hole and since the screw end is blind I may fill it with a black or brown plug.

In any event, I'll be installing both when dry and accomplishing the final coats of finish and rub outs with them in place on the now thoroughly scuffed up grip frame....polish that later.

i.imgur.com_VrQEDCc.jpg
 
Back
Top Bottom