• ODT Gun Show & Swap Meet - May 4, 2024! - Click here for info

Renegade Restore

A tour around the stock...but first, the first two coats of wax....rubbed in hard, hot, dried, buffed back, repeat 3 to 5 times...just two for now....we'll be handling the stock some more for bluing and final metal installation....

This is about enough wax to go inside and out one time. I was EVERYTHING including the bedding.

[Broken External Image]:

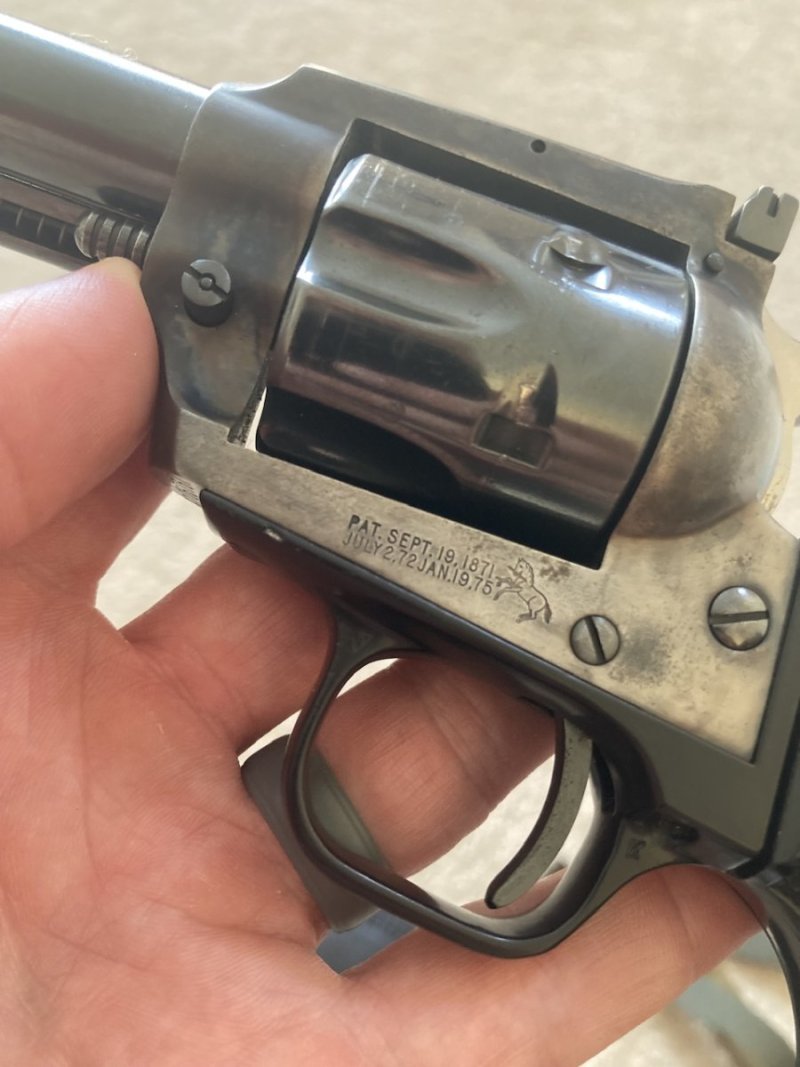
After a couple coats rubbed in hard, hot, dried and buffed, I installed the metal parts for now, screws too...they don't get lost this way. And I'll pull them in a day or so to start striking what needs to go to rust blue. But first gotta see my schedule and wrestle with that dirty bore.

[Broken External Image]:

i.imgur.com_KsxYD0Z.jpg


i.imgur.com_TvxLkpN.jpg


[Broken External Image]:

i.imgur.com_ofcY6JZ.jpg


Nose has been round over, under and around to trim up the profile from blunt to at least like a wooden nosecap.

i.imgur.com_3utroa4.jpg


Lock looks pretty good considerin all the rust. We didn't buff all that rust off, still some hidin there in the grease, its just dark brown with grease on it and it blends into the case colors. Just needs to be retouched occasional.

i.imgur.com_OU5PiqB.jpg
 
Plane and simple lock screw and washer in the newly shaped island of walnut that is the left side panel.

[Broken External Image]:

Cheek side butt. If you do not hand rub wood from sanding to waxing you will never see all the beauty the tree has to offer. Mostly its always hidden under quick and dirty gobbs of finish slathered on like deep fried sticks o butter stuck to yer face when yer at the county fair. Rub yer wood, ye'll be glad ya did.

[Broken External Image]:

i.imgur.com_uoW7coY.jpg


And packaged for storage. It stays wrapped from now on, it ain't mine and I ain't buttin the first scratch in it. So, careful, carful from here on out.

i.imgur.com_0rfl4E0.jpg
 
Its just warm enough with my trusty cheep damp box I can blue somma the small parts.

Ain't gonna be much of original finish on this gun. It would be nice to see it go back to the original owner with at least one or two parts that still looked like they did before breaking the original stock and cobbling together the replacement that is getting finished here. The lock is one piece, its colored so I left it alone rather than remove all the colors in an attempt to remove all the rust. Much of the rust is still on the outer surface of that lock, just cleaned a bit and blended in with the coating of Rig grease. But the triggerguard is still in wonderful cosmetic shape. Only slight wear around the edges. I'm going to leave it in TC finish....so, the working section of the gun, the action, will have its original finish and a bit of those years of wear showing around the edges. I think it'll look great.

As for some of this other metal....

The buttplate gets an 80 grit finish before rustblueing....its going to take a beating every time its loaded and such a finish helps blend out existing rust pitting at the very bottom edge of the plate.

The key plates and the tang get 120g finish...nice satin grey black when done. The barrel will also get the 120 finish....just a touch shiner than the matted TC front and rear sights and still no glare to deal with.

Tight fit on the key plates, lifting them out, I didn't pull this one straight up and lifted a chip on the edge....but the miracle clamp, saran wrap and a touch of carpenters glue puts the lifted feather back in place and it'll stay there. I believe I'm going to scout around for brass screws for these plates and perhaps for the tang and trigger guard as well. Findin slotted head screws these days can be a chore. (But strangely, the buttplate screws on this rifle are Phillips.)

i.imgur.com_OwtfcP9.jpg


The trusty cheep damp box pre heating with a wet paper towel in the bottom and a large coffee cup of water nuked for 3 minutes in the Radar Range.....Good steam for the rust.

[Broken External Image]:

The parts treated with their only Wet coat of pilkingtons (all subsequent coats are nearly dry wipes of rusting agent)....30 minutes and I'll check the first bloom, recoat, reheat the water and leave it sit till tomorrow morning, when I may do a first boil and carding.

i.imgur.com_i3t8itF.jpg


Here the glue has set and the key plate inlet looks just fine again.

i.imgur.com_nTtThcW.jpg
 
First rust. Always a joyous occasion round my place. And soon, TC soup.

Very nice bloom of rust on these components. I suspect they will blacken quickly with a fine grain and durable.

A second very thin, nearly dry coat is applied...after rusting agent is also a rust remover. all coats from here are nearly dry so as to build up rust, not remove it.

i.imgur.com_qicaQPz.jpg
 
After the boil, red rust is converted to black. Only the tightly bonded oxides will be left on the steel. For now they look fluffy.

i.imgur.com_pAX3uKy.jpg


After carding off the fluff with 0000 steel wool, we have a medium grey black of hard iron oxides, translucent but a very fine grained and even first blackening. Four to six further cycles of rust and boil will refine the color to deep grey black and move toward opaque.

i.imgur.com_xk2x0y4.jpg
 
Lots more black than grey after this second rust/boil and card. Still a bit translucent at the toe of the recoil plate so I'll flip that side up in the damp box....must be more humid on top than on the bottom of the box.

At this rate of color, these steel components should be done Thurs or Fri evening allowing complete reassembly of the stock. So, all that would be left is a barrel cleanup and reblue and location of some brass screws I hope.

[Broken External Image]:

[Broken External Image]:
 
This part is done. Small parts that needed it blackened, everything back in place, lock and trigger guard with its original but cleaned finish, all the old plane steel screws replaced with solid brass screws. That bit of plumb brown on the trigger bow looks awesome, been held onto a lot I'd say. Bright now but they can be browned a touch with oxpho or superblue or just left to the elements to take a natural dull finish. But a touch of bling and mostly the old battered stock and parts are in newer shape....a few more coats of wax and a barrel job and its ready to go home.

[Broken External Image]:

i.imgur.com_9FGdKsI.jpg


[Broken External Image]:

i.imgur.com_PBZSRTn.jpg


i.imgur.com_PDAxKN0.jpg


i.imgur.com_Fzj17kR.jpg


[Broken External Image]:

i.imgur.com_8l9OJt5.jpg
 
Back
Top Bottom