• ODT Gun Show & Swap Meet - May 4, 2024! - Click here for info

1949 Marlin 336 Refinish

Sharps40

Default rank <2000 posts
ODT Junkie!
4   0
Joined
May 17, 2010
Messages
1,948
Reaction score
1,023
Location
NC
Another project on line. Follow along with this one as well as the 35 Rem Stalking Rifle project for the summer.

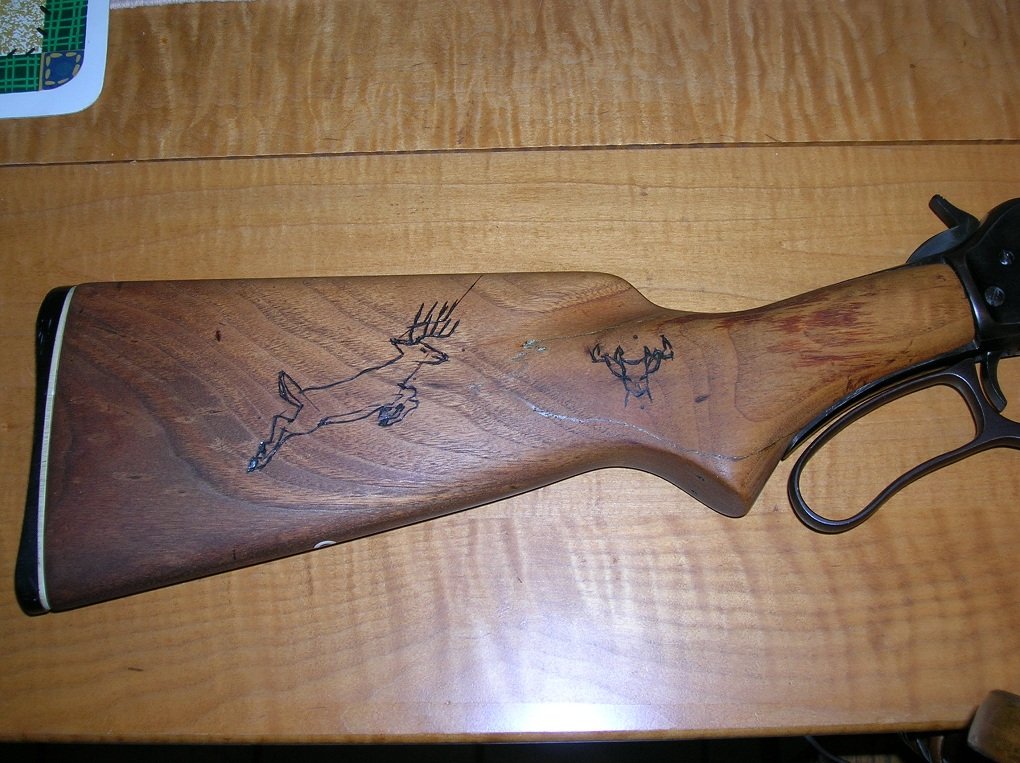
Well, here it is, and its BUBF! (Butt Ugly But Fine)

Marlin 336 SC, F code 1949 manufacture date, strong ballard rifleing, 2/3 lenght magazine and an added on late model front sight, broken buttstock and really hacked up forend that will be a challenge to save.

Mechanically, it seems all is well and the bore is pretty dag on nice, only a couple small pits mid bore. Should shoot great!

I'm just struggleing to decide if restoration should be limited to restocking and salvaging the forend or if the light rime of rust and thin blue merit a updated metal finish. It sure would look sweet done all over and the aparent mechanical condition would make a reliable and unique hunter...It would be neat for someone to take some game with a 62 year old Marlin and not worry about a scratch or ding while in the woods. (oh yeah, its got extra holes drilled and tapped in the left wall for an old side mounted scope, even the carving on one side of the forend shows a lever action with a scope, darn kids and their pocket knives!)
 

Attachments

  • 1949 336 SC 002.JPG
    1949 336 SC 002.JPG
    316.3 KB · Views: 341
  • 1949 336 SC 003.JPG
    1949 336 SC 003.JPG
    309.9 KB · Views: 319
  • 1949 336 SC 004.JPG
    1949 336 SC 004.JPG
    350 KB · Views: 278
  • 1949 336 SC 005.JPG
    1949 336 SC 005.JPG
    384.1 KB · Views: 271
  • 1949 336 SC 006.JPG
    1949 336 SC 006.JPG
    326.3 KB · Views: 272
Unfortunatly the carving of the rifle on the left side of the forend is nearly 3/16" deep at the "action" portion of the carving. Might be able to patch that part with a walnut plug, it'll show but look better than the carving. I wish I could save the butt stock but its split clean off and glued back together with elmers. I could document it, might be neet to go thru it and see if anything else is wrong, show the ways to fix it. (Gotta get back to that 35 Rem first though. I got a bunch of real work this month and I really want 10 open days in a row to get the 35 Rem blued and document the proces - then I'd like to shoot the blueing right back off it it!!!)
 
As you can see from the pics, Forend is salvaged. Fortunatly, there is plenty of good wood in a Marlin stock. Straight work with a rasp and then contouring with files and a sander and sand paper. Overall its a bit thinner now, but the panels are more flat and a bit more tapered, still hand filling but perhaps a bit more comfortable to grasp. Final finishing is indicated but this old walnut has gold, green and red tones. If I can avoid using stain, I won't use it, going with a simple clear finish to highlight those subtle colors.

Unfortunatly, the buttstock did not survive, removeing it, it fell apart at the break. It had been split from the tangs in the past and glued with some combination of glue like elmers and expandable foam. So, I'm looking for an uncheckered walnut Marlin 336 pistol grip stock (no plastic grip plate like on some of them). If you have one, PM me.

A look at the entire gun reveals additional and poorly drilled holes in the left action panel for an old side mount scope. I believe these can be plugged neatly with set screws, none of the holes will negatively impact the strength or suitability of the action.

Unfortunatly, the replacement modern Marlin front sight is a different story. The orignial factory holes were redrilled larger and retapped. Neither hole is straight up and down, one angles left and one angles right. In fact the rear sight base hole is oversize and enough off center to pull the sight base out of parallel with the bore centerline. I took several measurements, both front sight holes are drilled too deep. The amount of metal left in the barrel at the front sight hole is 23 thousands and the rear front sight hole is 28 thousands. I usually don't tap or cut sight bases so deep in a barrel, prefering to leave at least 80 thousands of metal above the bore and 1/10" is better. I'm not sure here, it may be the barrel has to be shortened and reinstall a sight with more metal above the bore. Not a big loss since this one has seen some abuse in 62 years.

Now, this Marlin has the old school one piece trigger and sear. That means it can be fired from open bolt unlike the modern 2 piece trigger/sear with the trigger block. It may be prudent to make minor modifications, install modern trigger parts and convert this one so that it can't be fired from the open bolt. We shall see.
 

Attachments

  • Forend 001.JPG
    Forend 001.JPG
    339.1 KB · Views: 225
  • Forend 002.JPG
    Forend 002.JPG
    337.9 KB · Views: 208
  • Forend 003.JPG
    Forend 003.JPG
    330 KB · Views: 208
This is a pretty classy old girl so we'll save the barrel since its pretty good inside and should make a fine jacketed bullet shooter or hard cast bullets with gas checks. The bore cleaned up nicely with an initial scrubbing and only has a little and very light pitting.

Given there was not a lot of roof left in the barrel where the late model front sight was installed (the holes were drilled oversize, crooked and way too deep) I shortened the barrel a minimum amount, 1 3/8" (Leaving an nice 18 5/8" tube). The initial marks were made lightly with a pipe cutter and serve as a guide for the hacksaw, the straighter the cut, the less there is to smooth away with the hand powered piloted faceing and crowning tools.

The muzzle was final squared with hand powered piloted faceing tool and an 11 degree resessed target crown was turned in place with the piloted hand cutter. With good cutting oil and after using the cutters a few times, they cut without chatter and so smooth as not to need a final polish. A q-tip passed across and thru the muzzle does not snag any cotton. With a smooth file, put a small bevel on the outer circumference of the muzzle, this eliminates the sharp edge left on the outside when you are thru with the facing cutter.

Leveling up the dovetail jig allowed rough cutting a new 3/8" dovetail slot by hand with a hacksaw. Then some file work to clean it up with the jig installed and sharpening up the angled edges with a two side safe dovetail file, again with the jig installed to prevent going too deep and too wide.

The roof over the bore is now over 80 thousands thick, more than sufficient amount of steel under the front sight to keep things in fine shape.

The plan for sights is a nice Marbles wide base front sight with gold or ivory bead. The rear sight will likely be Marbles Full Buck Horn adjustable or at least a Marbles Semi Buck Horn adjustable.

Lots of fine pitting on this barrel exterior, it may need a bead blast or if I am really industrious, draw filed then hand polished.

I did a check tonight. The bolt is later model, serial numbers do not match. There will have to be a headspace check and it may be prudent to fit a new locking bolt depending on the results.
 

Attachments

  • Front sight and barrel crown 001.JPG
    Front sight and barrel crown 001.JPG
    266.8 KB · Views: 210
  • Front sight and barrel crown 002.JPG
    Front sight and barrel crown 002.JPG
    217 KB · Views: 198
I bolted up a synthetic stock to this one yesterday and took it out for a function test at the range. It feeds fires and ejects beautifully and I was able to confirm some suspected problems to be addressed in the refinish/refit of this old gal.

a. Mainspring, tired and weak. There were two miss fires, it is likely why the previous owner filed a slot forward of the factory spring seat to add some zip by further compression of the spring. I'll put in a new spring. 62 years is a long time to be in service!

b. Chamber and bore is fine, the replacement bolt functions in all ways but there may be some excess headspace. All the primers on the 180g handloads and 150g factory Win Fusions werea bit high after firing. So, its obvious the 62 year old locking bolt should be replaced and a new one fitted.

c. The action is smooth as warm butter, cases feed in and out nicely and nothing (gun or case) is swolen, bulged or cracked.

It looks like I need to round up a walnut stock and a few minor action components and get to work.
 
Sharps40,

If you want I'm pretty sure Steve Parsons can repair that split butt stock and brace it internally. He did a couple of pistols for me and I looked at one of his stock repairs on a high end scattergun. It looked very good and saved a really nice looking buttstock for a cost savings also.


i54.tinypic.com_157ej39.jpg

Thanks - found a replacement. Really dont need a high end repair cost on a Marlin 336. But I'll keep the info against future need and appreciate it.
 
The stock arrived and with very minor effort, fits up nicely to the 1949 Action. Since this stock has not a drop of oil in the wood, I'll eventually put in a skin of glassbedding on the tangs to seal it and make it a snug fit for many years to come. But, thats another day.

Today I am filling two of the four holes previous owners drilled in the left receiver wall for a side scope mount. Only the two front holes have useable threads so I decided to fill them in a reversable manner. All the threads were cleaned and the holes chamfered a bit to accept a weaver head screw. The screws were shortened so as not to bind the bolt and threads also cleaned.

Each screw was wrenched in tightly with blue locktight and the heads neatly filed off. As you can see, the counter sinking really allows the repair to disappear when the action is initially polished. If not countersunk, you'll see the start of the thread on each screw as an ugly gap. These will never back out but if for some strange reason I ever wanted to reverse the repair and use the threaded holes, simply center drill, heat to ouch temperature with a soldering iron and an easyout will back the repair plug cleanly from the hole.
 

Attachments

  • Action Work 001.JPG
    Action Work 001.JPG
    214.6 KB · Views: 212
  • Action Work 004.JPG
    Action Work 004.JPG
    217.8 KB · Views: 198
The locking bolt arrived. In the pics below, the original 1949 locking bolt is always on the left. You can see it was previously molested with a file when the prior owner installed a replacement bolt. The total headspace created was about 40-eleven thousands inch...thats enough to get occasional missfires unless holding the bolt forward with your thumb. All the headspace is gone.

The replacement bolt took a couple hours of fit and try with interference marks from the contact between bolt ears and mateing face of the locking bolt leading the way. Carefull fileing, and then stoneing and finally lapping (of the angled mating faces of the locking bolt only), all the while maintaining the angles dictated by the contact marks on the locking bolt lead to a snug fit with no forward or back movement of the bolt in the receiver.

When lapping, it is critical to disassemble often and clear out all the grit that gets on anything but the bolt ears and forward mateing surface of the locking bolt. Tedious, but in the end this bolt bears evenly on both wings of the new locking bolt and all the excess headspace is gone.

Once I got to a point where I no longer needed a small screwdriver to help pop the lever open I switched from fileing/stoneing to lapping. About 100 cycles (with lots of cleaning) got the action to where it requries a bit more effort (additional zing on the lever like a really tight new gun) to open or close with dummy cartridges running in and out of the chamber. Winchester dummies work perfectly, Federal dummies need a bit more zing since the rims are a bit thicker. But, all the lapping compound is washed out of the guts now and a few hundred more cycles in front of the TV (with various dummy cartridges from Win, Fed, Rem, PMC - to check fit) and I expect it will wear in nicely, just like a new gun...A bit hard to open and close when brand new but really settles in for the long haul in a season or three of use.

Just for giggles I inserted a couple of the cases fired with the ill fitting 1949ish locking bolt, as you recall, the spent primers were high. Snapping the newly fitted action closed reseated those spent high primers just as nicely as my primer installer on the bench! So, I think this weekend I need to install a front "Try Sight" and head to the range and give the newly tightened action a try with Factory and Handloaded 30-30 ammunition.
 

Attachments

  • Action Work 005.JPG
    Action Work 005.JPG
    283.7 KB · Views: 179
  • Action Work 007.JPG
    Action Work 007.JPG
    290.5 KB · Views: 179
  • Action Work 008.JPG
    Action Work 008.JPG
    307.8 KB · Views: 178
Back
Top Bottom