This post is going to be a somewhat ongoing work in progress as I'm not finished and ready to start assembling yet, but I've got a good bit of work done, so I'm almost there.
Over the last year I've taken an interest in the 1903/1903A3 Springfield drill rifles that occasionally turn up for sale and bringing those rifles back to life. I've found that it's a pretty cheap way to get into a shooter grade 1903 or 1903A3 Springfield rifle without a lot of effort. The fact that they had been welded on also doesn't make me feel bad about drilling and tapping for sniper clones, etc. Granted, with CMP prices on Springfield's lately, it's not the absolute best value these days (a shooter grade Springfield from CMP for $650 that hasn't been molested is a phenomenal price these days), but I've found that with these drill rifles, you can build out your rifle as correct as you want and be into it for $500 or less. While a recovered drill rifle will never be a collector piece, I see no reason that these won't appreciate in value any differently than all the other mil-surp stuff that's out there. Most of the work, believe it or not, can be done with a Dremel (yikes) with very acceptable results. You would need a barrel vice and action wrench for the rest of the work. These rifles were converted to drill rifles by putting a tack weld over the face of the bolt, the firing pin is clipped, the barrel is tack welded to the receiver (literally just a dab) and then the magazine cutoff is welded so that it can't be rotated and the bolt removed. These welds are usually very light and don't hardly penetrate into the receiver.
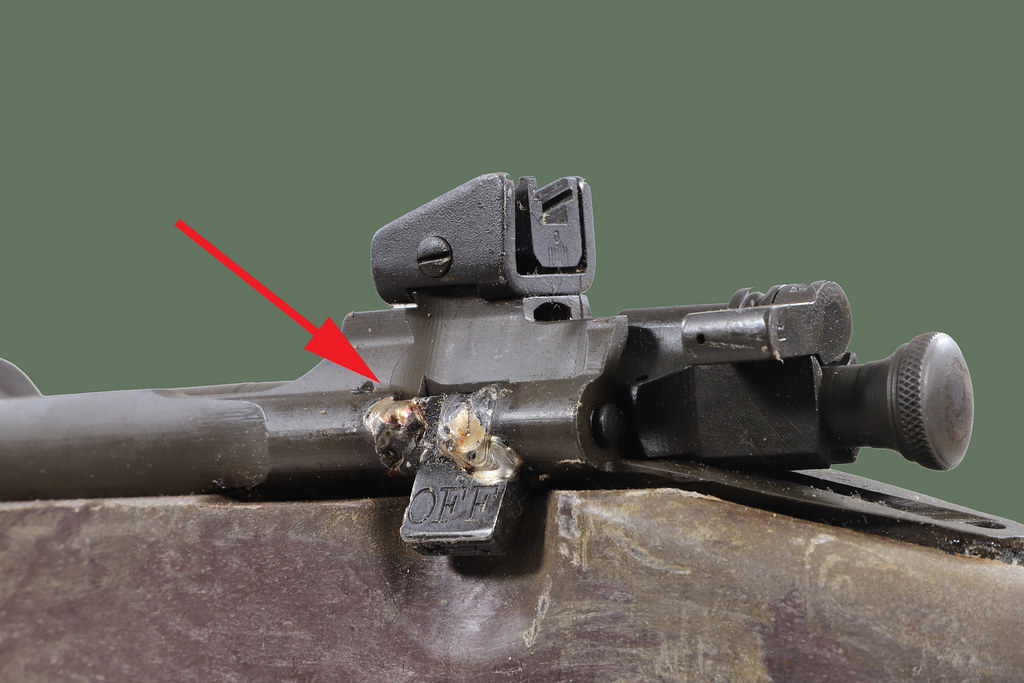
Depending on where the weld is placed makes an impact on how easy it is to clean up the mess. The first pic below, while it looks gnarly, is actually a really easy cleanup since it's all on rounded surfaces that are easily blended.
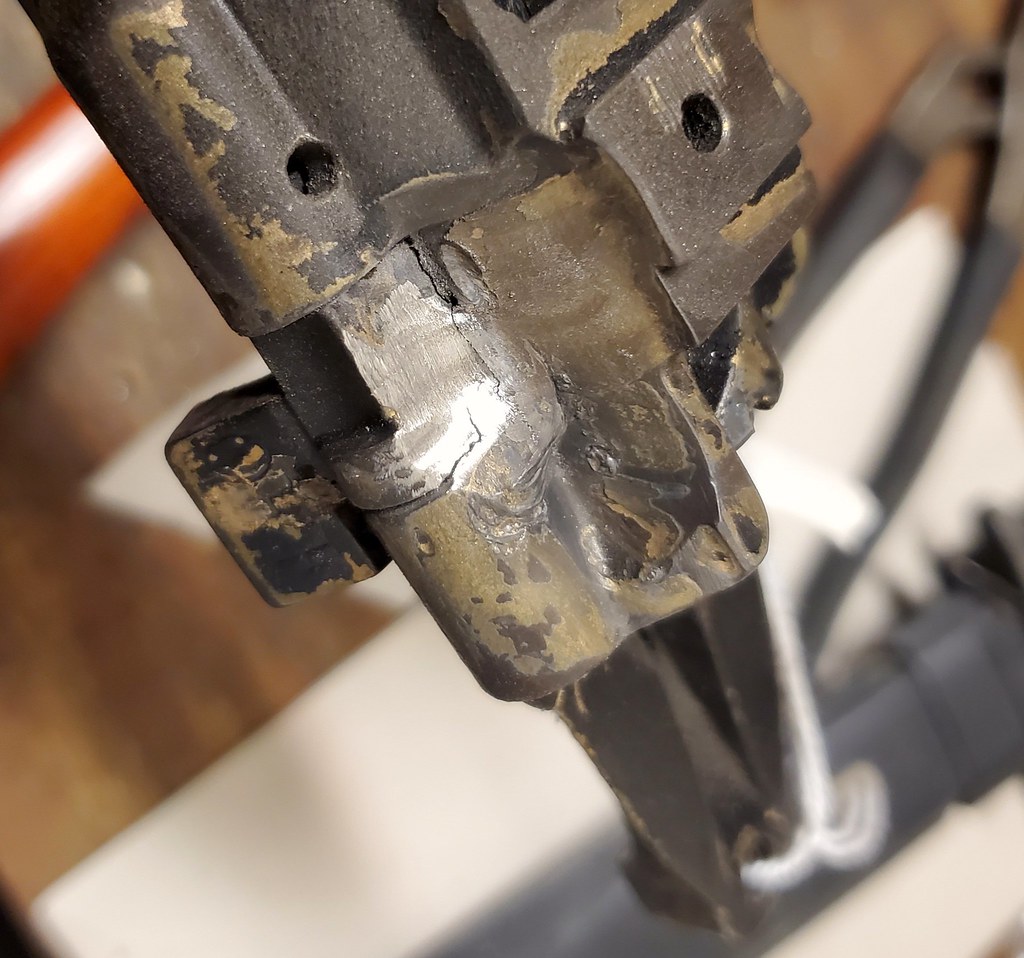
The pic below, while more aesthetically pleasing, is more of a pain in the rear that you need to take care with. The weld is in the space between the magazine cutoff and the extends over a flatter area of the receiver. Of course, someone with a mill can make some seriously easy work of this to make it really clean. We're working with a Dremel tool here, so how clean it is only depends on how steady your hand is.

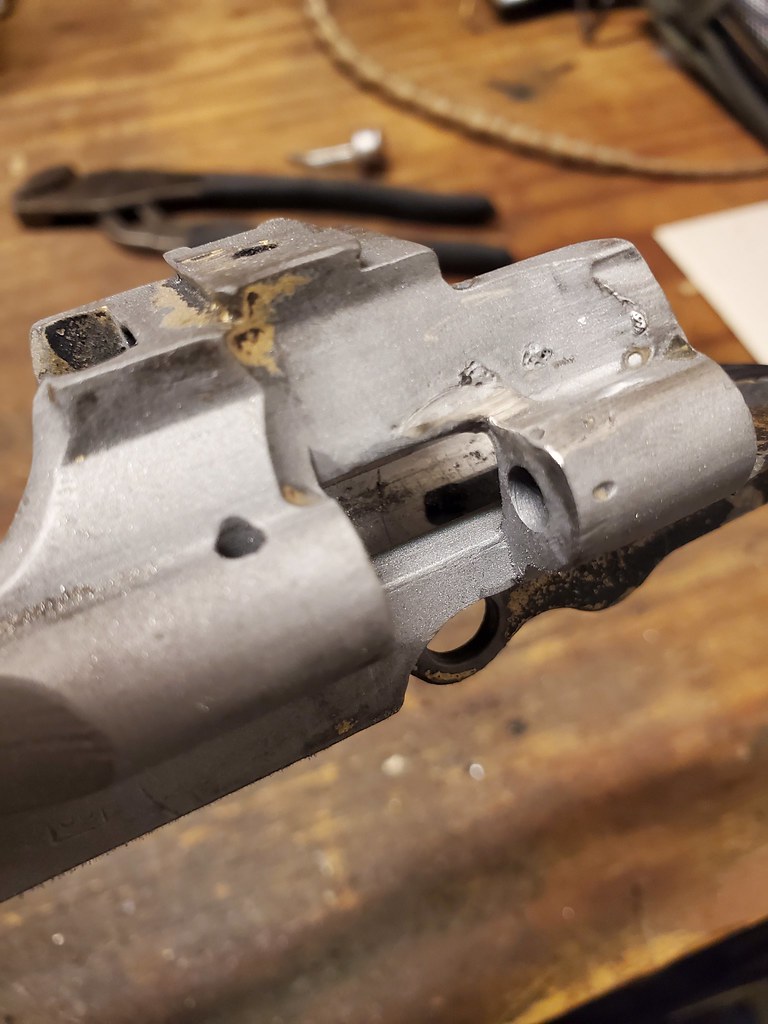
So, I recently picked up 3, 1903A3 drill rifles via Dupage Trading in Arizona. What you get is the luck of the draw as far as the overall condition, but that don't matter as it's all coming apart anyway. So these 3 rifles were advertised as Remington 1903A3's and what I received I was pleasantly surprised over. I received not 1, but 2 Smith Corona 1903A3's and the real prize - a Remington 1903A3 that was actually a 1903A4 sniper rifle converted to a drill rifle. The 1903A4's were actually marked as A3's with the idea that if the rifle isn't a shooter, it's still an A3 that they could put into service. They came in the plastic "drill" stocks that a lot of ROTC/VFW organizations used and they had 3 serviceable wood A3 handguards. You're going to keep all of the hardware, with the exception of the bolt, barrel, firing pin and mag cutoff - those are trashed. You may have to buy some other miscellaneous small parts depending on how disassembly goes - if you're lucky, it'll come in a wood stock. The plastic ones can be shot, but let's face it - they're kinda lame for these rifles. Of course, I've taken no pictures of these when they arrived, but the 1903A4 barreled action is pictured below - I dub it "C3PO" and I'm really curious to know what the story is in how it received such a hideous paint job.

Looking over the rifle, I'm glad to see that when they deactivated (technically not demilled) the rifle, they didn't destroy a perfectly good 1903A4 bolt and barrel in the process.
So now that you've got the action in your hands, strip it down as far as it'll go, which basically means taking the rear sight off, trigger mechanism, the pin for the ejector and the small retaining screw in the mag cutoff. If you're lucky, when you remove the retaining screw - the pin holding the cutoff will slide out. If it doesn't grab the end of the pin with a pair of needle nose pliers and see if it will rotate - if it does, this is good as it means that there isn't weld on it. If it doesn't, well......
So the primary Dremel bit that I use for this work is the small sanding drum with a course sanding band fitted. I like these because you can get to work but it's not so terribly aggressive that a slip is going to mess things up. Trust me, you can get ahead of yourself even with a sanding band, so go slow and check your work frequently. You know when you're getting into material besides the weld because you'll start to see sparks fly. The stainless weld material doesn't spark nearly as much.
The first barreled action I tackled was 1 of the Smith Corona drill rifles. Smith Corona was the other manufacturer of 1903A3 Springfields for military use and there are less numbers of these than the other manufacturer - Remington. For spare parts, as long as you're not worried about correct - 1903A3 parts are often dirt cheap and they're usually Remington parts. Smith Corona specific parts, while still not terribly expensive, command a higher price than the Remington stuff. Ebay is a great source for a lot of this stuff. I didn't take a pic of the weld on the cutoff before I started, but it was in the sweet spot, right on the rounded portion of the receiver. Not only that, I could get all of the cutoff parts out, with the exception of the cutoff itself - so those are less parts to buy. And nope, not a single picture of the work in progress, but you can see the final result further down. Just go slow and constantly stop to look over your work. I like to use my fingertip/fingernail to feel for the transition from receiver to weld and sand away at that so that it's a smooth transition and blends nicely. Once you start thinning the weld, use a punch to softly start tapping at the cutoff to crack the weld. Don't get heavy handed with the hammer - you can actually crack off a piece (non critical piece) of the receiver above the cutoff that looks unsightly if it's missing but doesn't affect shootability. The pic immediately below is what happens when you get too aggressive, then you have to try and make it look decent. Ugly ain't it? Again, most of the uglyness will be hidden by keeping the magazine cutoff flipped up, but you still know it's there. You're never going to not make it look like a drill receiver - a careful eye will reveal the history, but you do want it to look nice.

Anyway, so I finished up cleaning the area around the mag cutoff of the Smith Corona and I think it didn't come out bad at all......


With the 1903A4, I used the same process - go slow and check frequently. I wanted to be especially careful with this receiver as it is an A4 receiver after all. The serial on this receiver also make it one of the earlier ones. The weld was in the crevice of the cutoff, so I had to be more careful. The sparks you see in the pic below are because I'm slowly inching forward into the weld on top of the magazine cutoff. The sparks are because I'm eating into the unwelded parts of the cutoff - it's trash anyway since you can't reuse it, so it makes a convenient "rest" to steady yourself.

Tapping at the cutoff to crack the weld:

Cracked Weld:
Once you get the weld cracked, you can often wiggle the cutoff with your fingertip. I'll then take a pair of vice-grips and clamp in on the end of the cutoff and wiggle it back and forth until I can get it out - assuming the pin holding it in comes out. That was not to be the case for this receiver though - the pin holding the cutoff in was stuck. It spun, but I could not pull it out for the life of me. So that lead to Plan B - the dreaded cutoff wheel.
Using the cutoff wheel, I cut out the center section of the magazine cutoff. GO SLOW - you don't want to cut into the receiver, you just want to cut through the cutoff. Once I had the center cut out - I used a small punch to drive out the right half of the pin out of the hole. It's a blind hole, so it'll only go out to the right. Once the right side was out, I was able to have more room and used needle nosed pliers to pull the other half out.

Cont'd
Over the last year I've taken an interest in the 1903/1903A3 Springfield drill rifles that occasionally turn up for sale and bringing those rifles back to life. I've found that it's a pretty cheap way to get into a shooter grade 1903 or 1903A3 Springfield rifle without a lot of effort. The fact that they had been welded on also doesn't make me feel bad about drilling and tapping for sniper clones, etc. Granted, with CMP prices on Springfield's lately, it's not the absolute best value these days (a shooter grade Springfield from CMP for $650 that hasn't been molested is a phenomenal price these days), but I've found that with these drill rifles, you can build out your rifle as correct as you want and be into it for $500 or less. While a recovered drill rifle will never be a collector piece, I see no reason that these won't appreciate in value any differently than all the other mil-surp stuff that's out there. Most of the work, believe it or not, can be done with a Dremel (yikes) with very acceptable results. You would need a barrel vice and action wrench for the rest of the work. These rifles were converted to drill rifles by putting a tack weld over the face of the bolt, the firing pin is clipped, the barrel is tack welded to the receiver (literally just a dab) and then the magazine cutoff is welded so that it can't be rotated and the bolt removed. These welds are usually very light and don't hardly penetrate into the receiver.
Depending on where the weld is placed makes an impact on how easy it is to clean up the mess. The first pic below, while it looks gnarly, is actually a really easy cleanup since it's all on rounded surfaces that are easily blended.
The pic below, while more aesthetically pleasing, is more of a pain in the rear that you need to take care with. The weld is in the space between the magazine cutoff and the extends over a flatter area of the receiver. Of course, someone with a mill can make some seriously easy work of this to make it really clean. We're working with a Dremel tool here, so how clean it is only depends on how steady your hand is.
So, I recently picked up 3, 1903A3 drill rifles via Dupage Trading in Arizona. What you get is the luck of the draw as far as the overall condition, but that don't matter as it's all coming apart anyway. So these 3 rifles were advertised as Remington 1903A3's and what I received I was pleasantly surprised over. I received not 1, but 2 Smith Corona 1903A3's and the real prize - a Remington 1903A3 that was actually a 1903A4 sniper rifle converted to a drill rifle. The 1903A4's were actually marked as A3's with the idea that if the rifle isn't a shooter, it's still an A3 that they could put into service. They came in the plastic "drill" stocks that a lot of ROTC/VFW organizations used and they had 3 serviceable wood A3 handguards. You're going to keep all of the hardware, with the exception of the bolt, barrel, firing pin and mag cutoff - those are trashed. You may have to buy some other miscellaneous small parts depending on how disassembly goes - if you're lucky, it'll come in a wood stock. The plastic ones can be shot, but let's face it - they're kinda lame for these rifles. Of course, I've taken no pictures of these when they arrived, but the 1903A4 barreled action is pictured below - I dub it "C3PO" and I'm really curious to know what the story is in how it received such a hideous paint job.
Looking over the rifle, I'm glad to see that when they deactivated (technically not demilled) the rifle, they didn't destroy a perfectly good 1903A4 bolt and barrel in the process.
So now that you've got the action in your hands, strip it down as far as it'll go, which basically means taking the rear sight off, trigger mechanism, the pin for the ejector and the small retaining screw in the mag cutoff. If you're lucky, when you remove the retaining screw - the pin holding the cutoff will slide out. If it doesn't grab the end of the pin with a pair of needle nose pliers and see if it will rotate - if it does, this is good as it means that there isn't weld on it. If it doesn't, well......
So the primary Dremel bit that I use for this work is the small sanding drum with a course sanding band fitted. I like these because you can get to work but it's not so terribly aggressive that a slip is going to mess things up. Trust me, you can get ahead of yourself even with a sanding band, so go slow and check your work frequently. You know when you're getting into material besides the weld because you'll start to see sparks fly. The stainless weld material doesn't spark nearly as much.
The first barreled action I tackled was 1 of the Smith Corona drill rifles. Smith Corona was the other manufacturer of 1903A3 Springfields for military use and there are less numbers of these than the other manufacturer - Remington. For spare parts, as long as you're not worried about correct - 1903A3 parts are often dirt cheap and they're usually Remington parts. Smith Corona specific parts, while still not terribly expensive, command a higher price than the Remington stuff. Ebay is a great source for a lot of this stuff. I didn't take a pic of the weld on the cutoff before I started, but it was in the sweet spot, right on the rounded portion of the receiver. Not only that, I could get all of the cutoff parts out, with the exception of the cutoff itself - so those are less parts to buy. And nope, not a single picture of the work in progress, but you can see the final result further down. Just go slow and constantly stop to look over your work. I like to use my fingertip/fingernail to feel for the transition from receiver to weld and sand away at that so that it's a smooth transition and blends nicely. Once you start thinning the weld, use a punch to softly start tapping at the cutoff to crack the weld. Don't get heavy handed with the hammer - you can actually crack off a piece (non critical piece) of the receiver above the cutoff that looks unsightly if it's missing but doesn't affect shootability. The pic immediately below is what happens when you get too aggressive, then you have to try and make it look decent. Ugly ain't it? Again, most of the uglyness will be hidden by keeping the magazine cutoff flipped up, but you still know it's there. You're never going to not make it look like a drill receiver - a careful eye will reveal the history, but you do want it to look nice.
Anyway, so I finished up cleaning the area around the mag cutoff of the Smith Corona and I think it didn't come out bad at all......
With the 1903A4, I used the same process - go slow and check frequently. I wanted to be especially careful with this receiver as it is an A4 receiver after all. The serial on this receiver also make it one of the earlier ones. The weld was in the crevice of the cutoff, so I had to be more careful. The sparks you see in the pic below are because I'm slowly inching forward into the weld on top of the magazine cutoff. The sparks are because I'm eating into the unwelded parts of the cutoff - it's trash anyway since you can't reuse it, so it makes a convenient "rest" to steady yourself.
Tapping at the cutoff to crack the weld:
Cracked Weld:
Once you get the weld cracked, you can often wiggle the cutoff with your fingertip. I'll then take a pair of vice-grips and clamp in on the end of the cutoff and wiggle it back and forth until I can get it out - assuming the pin holding it in comes out. That was not to be the case for this receiver though - the pin holding the cutoff in was stuck. It spun, but I could not pull it out for the life of me. So that lead to Plan B - the dreaded cutoff wheel.
Using the cutoff wheel, I cut out the center section of the magazine cutoff. GO SLOW - you don't want to cut into the receiver, you just want to cut through the cutoff. Once I had the center cut out - I used a small punch to drive out the right half of the pin out of the hole. It's a blind hole, so it'll only go out to the right. Once the right side was out, I was able to have more room and used needle nosed pliers to pull the other half out.
Cont'd